Wednesday, November 30, 2011

slipper bench redo!

Quite some time ago (actually it's been even longer than I'd like to admit) I found this little treasure at a flea market with the whopping price tag of $3.


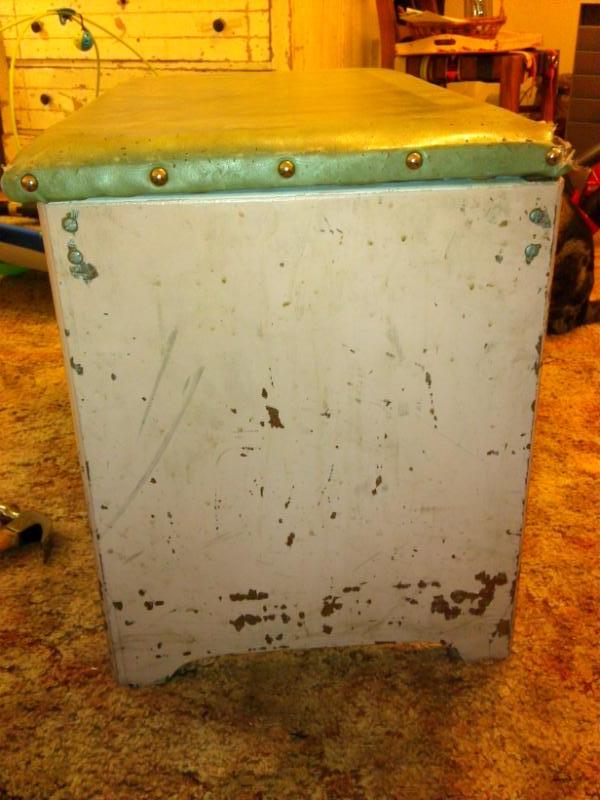
I actually liked it as is when I bought it, especially the color of the top (the pale pink bottom I could have done without), but I always figured I could redo it when I got sick of it.

....annnnnnnnnnnnnddd 4+ years go by...

There, I admitted it. I never could make up my mind on what to do, and it wasn't really a priority.  A week or so ago I realized I was storing it under my coffee table because it clashed so badly with my living room.  Totally unacceptable.  Now it was priority level one.

First step...new paint.  I coated the bottom with a navy satin spray paint.  I used to actually sand, prime, and paint all my furniture, but once you use spray paint, you never go back.  It's faster, easier, and gives you more even coverage...IF you can get the right color.

My original plan was to rip the foam on the top off and replace it with something thicker, but once I pulled all the vinyl off, I realized that foam was not going anywhere.  So I just put the padding on top.  I bought this stuff called NU-Foam at Jo-Ann's (mostly because it was cheaper than regular foam) but it is pretty neat stuff.  I cut it to size and tapered the edges.


I put duct tape rolls between the layers to (kind of) hold them in place, then I layed the fabric over it, flipped it over, and staple gunned it on the underside.  Note: The more staples you use, and the tighter you can get the fabric, the better overall look.

To place the buttons on the top, my original plan was just to staple gun where I wanted them to go and then hot glue the buttons over the top.  Epic fail.  After my 5th staple sproinged out and went flying across the room*, I had to go to plan B...nails.  It worked surprisingly well.
*At which point I had to get up and run and grab the staple before Thor ate it.  He thought this was pretty much the best game ever.


Then I used some trim that I had purchased for a project I never got around to for the edge, and held it on with upholstery tacks.


It turned out even better than I thought! And because I love before and after pictures (and am trying to teach my self photoshop)...


Cost
Slipper bench: $3
Foam: 4.79*
Trim: Already had
Buttons: $1.93*
Fabric: $3.74
Upholstery Tacks: $3.00
Spray Paint: $3.44
TOTAL COST: $19.90

*Special thanks to the lady at Jo-Ann's who slipped me coupons when I realized I stupidly forgot mine.

Tuesday, November 29, 2011

DIY Bathroom Organizer

I have a serious love/hate relationship with apartment living.  I love that someone else shovels my sidewalks, pays for W/S/G and comes and fixes things when they break.  I hate that I have to listen to my neighbor's conversations and most of all, my lack of storage. 
But it does force me to be creative.

I saw a picture of a similar organizer online and had to have it...


First step: Call my dad and ask him what those thingys are called that look like metal zip ties. Apparently they are called ring clamps. And you can get them anywhere. Who knew?

Let me preface by saying I am really not a ditz...but when it comes to power tools and the like I am pretty clueless.*

*My dad got me this really extensive tool set when I graduated high school, so far I have discovered that the clamps work great as chip clips and the screwdrivers also work well as prybars for unfortunate oven accidents (don't ask).

Next step: Pick a day when my pops would not be in his shop and thus unable to cringe at my misuse of his power tools.

Supplies
Cool board (or uncool, your choice), cut to the length to fit your space.  I used a piece of old molding**
**which I cut by hand because I was pretty sure I'd lose a limb with the power saw. #goodworkout
2 eyehooks
Baling, or other thick wire
Drill
3 ring clamps (also these come in sizes, again...who knew? so sized to fit over the lip of your jars)
3 mason jars

Step 1
Set your jars on the board, and figure out how low you want them to hang. Measure the length of your board and divide that into fourths.  Mark the middle three at the level you want your jars to hang.  Next, place a ring clamp centered over the mark you just made (sticking out like it was holding a jar) and mark above and below it.  These will be the holes you drill to wire the ring clamps onto the board.

Drill holes where you marked...these do not have to be pretty or perfect (mine certainly weren't).

This is also a good time to install your eyehooks at the top.  I measured equidistance from each end, drilled a tiny bit and screwed them in by hand.  There might be a better way, but I don't know what it is.


Step 2
Cut a length of wire (the longer the easier to work with...I probably cut them at around 12") and poke one end through each of the holes. Pull the ends and get the wire as tight as you can.

Using pliers, twist the wire a couple of turns to secure it.  Cut off the long tails, and bend the twisted wire to one side or the other.


It should look like this from the front when you're finished...


Step 3
Open your ring clamps all the way and thread one end through your wire loop.  Repeat with remaining 2 clamps.  Tighten them down part way and set jars in the clamp.  Tighten as much as possible...and viola! Organizer complete!


Organizer in use:


Friday, November 18, 2011

freepeople knock off cowboy boots

I saw these boots on freepeople.com...


...and totally fell in love.

But not with the price tag ($438). Are you getting the idea that I'm cheap yet? Or that I like to shop for things I can't afford? Good. We'll be besties before you know it.

There's one more thing you should know about me before things get too serious--I am an eBay addict. Which is how I ended up with a pair of vintage cowboy boots in my closet.

See the problem with eBay is that the pictures aren't always perfect representations of the product...so I have these men's vintage cowboy boots that really aren't cute enough to wear with skirts and jeans (they're a little too industrial) but I paid $18 for them and wasn't quite ready to give up on them.

And then I saw the magical boots above. Perfect.

In addition to the $18 boots, I bought 4 kind of matching leather belts from my favorite thrift shop.  Total cost for my version: $20.

I cut the boots down the back (no special tools necessary, I just used kitchen scissors, and these were way thicker than any of my other cowboy boots).

I apologize in advance for the photo quality...I am currently without a digital camera, so these are off my phone.


Then folded the tops over.  This took some serious manuevering because of the super thick leather, but I figured it could also count for my daily workout.


Then I wrapped the belts around (and through the pulltabs) until they cinched the tops.  I lucked out, because the belts I bought were punched where I needed, but otherwise I would have just added a hole where I needed it.

Overall, I love the look of these, they're really different, and I got a lot of compliments on them their first time out.  However, there are a couple of things I would do differently:
  1. I secured the loose ends of the belts with hot glue in the hope that if I wanted, I could switch them out.  That held for maybe half a day.  I would definitely use a stronger glue, or maybe make a leather belt loop to hold it.
  2. The boots I used were way too heavy duty...it was sort of like wearing cement blocks for shoes. But no one said beauty was comfort, so I'm still wearing them.  That is, until I find a new eBay love.


Anthropologie-inspired Sailor Necklace


Let me start by saying this is not for the faint of heart. This is a statement piece, so if you're going to wear it, you've got to flaunt it...which is also why half of the people who see it love it, and the other half hate it.

The other issue?

I waited too long to post this, definitely did not take enough pictures, and Anthropologie no longer has my inspiration necklace. But it was there. Really.  And it had the small price tag of $598.

Seriously.

That is rent and a half.  Anyway, craft stores here are limited at best, but I was able to get all my supplies at Jo-Ann's.

Supplies (for an average size choker)
1.5 yds of each of three different thicker cords
(you might consider getting 2 yds if you want more room to play)
1-2 yds. of smaller coordinating trims/cording
1/8 yd coordinating fabric (optional)
Glue gun and sticks
Toggle closure
End caps (pictured below...the bigger the better...I ended up needing 4 because they were smaller)
Eye hooks with posts (pictured below)
Large jump rings
Beads or other fun accents
Clothespins, tape or some kind of clips (optional, but reduce swearing)


Step 1

Put a dab of hot glue into the narrow end of your end cap and stick a eye post in so that the ring on the post extends above the end cap.  This is how you will attach it to the jump ring.  Repeat with all end caps. Cut off any excess post that hangs below the end cap.

Step 2
Now the knotting fun begins! Hold the end of the 3 thick cords at the base of your neck, and stick a clothespin about where you want your knots to start.

Rather than attempting to explain the knots, I am just posting pictures...I hope it is clear enough.  I'll post more pictures when I get around to making another.

First create you base knots with the three main ropes, as well as a medium rope added at the clothespin:
Feel free to experiment with different ropes/knots!

After the main knots are done, I wove some fabric in to help clear up some of the dead space:


I sewed my fabric in a tube before weaving, but it was really an unneccessary step.

Then I added more fabric here and there until it looked right, securing all ends with hot glue.  Finally I glued the cords together where the clothespin was holding them.

But what about the raw glue where the clothes pin was?

I covered that in fabric too! If you have enough leftover trims you could also wrap that area in cording instead (I didn't have enough to do that).

Now add beads and embellishments until it looks right.


Step 3
DISCLAIMER: This step may induce swearing, stomping of the feet and possible burned fingertips.

Now it is time to attempt to shove the fat cording into the seemingly too small endcap. (I pray for your sakes that you were able to find larger endcaps than I was...BUT it is doable! I promise).  I took the smaller of the two cord and taped the ends as tight as I could, put some hot glue in the end cap, and shoved the cords in.  NOTE: Hold until your glue dries...I didn't the first couple of times, hence the swearing and feet stomping.

Repeat with remaining cords.  You could also do each cord in its own end cap, and avoid the headache, but I only had 4 on hand.

Use jump rings to attach cords to closure. Annnnd you're done!

Who I'm Following

Here are a few of my favorite things (or blogs, whatever).

Craftberry Bush
I LOVE this blog.  A lot of the projects are geared for the more experienced crafter, but oh so worth it.

Kate Anfinson
She's one of those people who is so disgustingly cute you really want to hate them...but you can't.  Beautiful photography, DIY projects, and, of course, fabulous fashion.

A Beautiful Mess
Yes, she also disgusts me with her fabulousness. In fact all these people do, so I better just let it go.  Anyway, lots of really fun projects...you can easily get lost for hours.

Madigan Made
Really simple but cool craft projects that will make you slap your forehead and say "Why didn't I think of that?!"

EmmylouBeeDo
A fun, laid back blog with lots of good ideas for kids.

Thursday, November 17, 2011

Finally....

My sister has been bugging me for a couple of years now to start a couple of blogs.*
*and yes, her punishment will be a few guest posts.

So I have.

Started a couple that is. But never finished.  I suffer from a bit of procrastination.  I'll deal with that later.

That being said, I craft...a lot. Which of course means I steal ideas from other people's blogs, and I guess it's only fair that I start one for other people to steal ideas from.

A quick bit about me and this blog...aside from what's over there <---.

I am from a small town. In fact, imagine the smallest town you can think of and divide it by 100. That's where I grew up.  I would say that it is the shelteredness (is that a word?) of that town that got me into fashion and sewing.  I was the only kid in my 6th grade class who owned snake skin print pants...and wore them boldly in public.  If it was mainstream, I didn't wear it.  Call it a quiet rebellion.

But in Small Town USA, it is difficult to shop for clothes outside the norm, so I had to learn to sew.

And such is the birth of hailey elise designs (one of the tabs that will be coming soon).  It started as handbags made from repurposed clothes, but I've been really into making clothes as of late, so it's sort of morphing.*
*trust me, I know it's not a real line, but I did sell a couple of bags, and needed a brand...watch out Michael Kors.

Also, I am really, really frugal.  For this, my sister teases me mercilessly. I can't help it...with the procrastination--to be dealt with later.  The good news is, I craft on a budget.  Or find things that I want and think "pssh I could make that" (often, it turns out, I actually cannot). Oh well.  But the stuff that does work will be in my Tutorials tab.

As for the rest of my life, it is either spent on the back of a horse (I have 2, spoiled rotten, that I train and compete on)...or reprimanding, unintentionally crafting with (he likes to "help"), or attempting to remove my arm from the death clamp of my cat, Thor.  He has a hand in all of this as well.  So blame him for all problems, because, well, he really doesn't care.  Trust me.