Tuesday, December 20, 2011

Last minute Christmas gift ideas...


Honestly, if you're reading this today looking for gift ideas, take my advice: go buy a gift card.  But if you too have a strong desire to cause yourself undue stress this holiday season, please read on...

These are quick, easy gift ideas that I have used on more than one occasion when I need a quick gift.

Infinity scarves
All you need is 2 yards of fabric and half an hour (or less).  There are a ton of tutorials out there, so you can easily pick one based on your style/budget.  My personal favorite pattern is here.


Wood Ornaments
These are definitely my go-to for last minute giftys.  You need a wood ball, ribbon, and paint.  I just paint a wintery design on the ball, loop some ribbon on the top, and secure with a staple gun.


Food
Never, ever underestimate the gift of food.  I LOVE getting baked goods around the holidays...it's one less stresser.  I like to give out those jar cookie mixes, topped with ribbon and a cute label (my favorite are Cranberry Hootycreeks, because of the festive colors).
However, my favorite food type gift to give is pancake mix and syrup.  I found the best syrup recipe ever here...it got rave reviews from everyone!

Alcohol
For the over 21 crowd of course...after getting my last heat bill, I found myself relying on a liquid blanket a time or two to keep warm.  I saw this picture on pinterest, and couldn't wait to create my own "reinbeer."
I think it would make cute wine bottles as well.

Unfortunately all my other clever ideas can't be posted until after the holidays, so stay tuned!

Thursday, December 15, 2011

My top 10 crafting necessities: the final 3...

...Plus some more, because I can't count.

I apologize for the blogging inconsistencies...unfortunately my crafting procrastination has taken over what is left of my life.  The amount I need to accomplish in the mere week before Christmas seems insurmountable.  What's that you say? It can't be that bad?

Guess who's got two thumbs and was at the movie theater last night at 9:45 buying a gift card for our Christmas party tonight? This girl!

And are the rest of the gifts for my coworkers done for tonight? Nope. But they will be, dammit.

I graduated in May of this year, and it seems counting to ten has already become difficult. Okay, not really, I had a list of my top ten, but I keep thinking of more, so here's the last of things necessary for crafting survival.

Good Scissors

Preface: DO NOT spend millions on scissors! You can easily pick up a pair of Fiskars at Jo-Ann's or other crafting stores for under $10.

If you are doing any kind of detail work or even something as simple as cutting out a pattern, the scissors you use can make a huge difference! I recommend that you have at least 2 good pairs...one for papercrafting and one for fabric.  And do NOT let the rest of your family/roommates/squatters use them for anything else.  Because to most men, scissors are scissors.  Hide them, hoard them.

Open Storage

Now, before you start thinking that you don't have time or money for custom craft storage, please know that you're not alone.  And though I dream of one day having a separate crafting/sewing building where I will be able to iron in peace...it's not the case:


There are several reasons I think it is crucial to have your fabric/papers out where you can see it:
1) It leads to crafting inspiration.
I will sometimes just wander in and look at my fabric shelves, and think "That cotton needs to be a pillow. It calls to me."  Okay not really, but if I'm thinking of a project, and I see the right fabric, it's like all the pieces come together.
2) It will save you money.
When I used to store my fabric in boxes and totes, I would get so frustrated trying to find what I was looking for that I would just go buy it.  And then after the project was done, I'd find a cut of fabric that would have worked better.  Commence state of anger.
3) Boxes suck.
No explanation needed.
4) If you color coordinate your fabrics, it makes browsing easier and it looks rull purdy.

So what do I use for my open storage? Bookshelves. Cheap, ugly bookshelves.  They don't take up much room, and once you fill them with fabric, you don't notice their ugliness.  Mine were hand-me-downs, but you can get them used off craigslist or from yard sales for less than $10.  And if you really hate that simulated wood finish (understandable), spray paint them.

Notions, Notions, Notions

Know them, love them, and stock up on them.  ALWAYS have an arsenal of pins, needles (sewing machine and hand sewing), thread, buttons, tape, fasteners, etc.  I HATE having to stop a project because I don't have the right velcro on hand.  It usually means the project goes to the bottom of the "to finish" pile (aka projects that will probably sit for years until I go on a cleaning streak and toss them).

It is really important to know your notions too.  Not all sewing machine needles and thread are the same.  If you are sewing with a lightweight knit, you want a thinner needle and thread than if you're sewing through canvas.  Yes, all purpose products will work, but are more likely to damage your fabric if you're working with lighterweight materials.  Just remember: delicate fabrics=delicate notions, heavy fabrics=heavier notions.

Pins are the same way.  If you try to pin through leather with satin pins, you probably will just bend your pin and end up stabbing yourself #bloodalloveryouralmostfinishedproject.  For most projects I use satin pins with glass heads (so you can iron over them), but I do have a stash of heavier duty pins for making bags, etc.

Finally, know when to change your needles, blades, sharpen your scissors, etc.  Maintenance is just as important.  Change your sewing machine needle every project or 2, depending on what it is...you will love the difference in your machine.  Also, if you're working with fluffy fabrics (polar fleece, etc.) clean under your bobbin holder frequently, it is amazing how quickly things build up in there (I didn't...for like a year. AND then I had to take my whole machine apart and clean it.  It was a REALLY fun day.
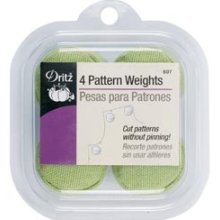
Pattern Weights

Have you heard of these little things?? I am OBSESSED! Not only will you have more accurate cuts, but it cuts your prep time in half or more!  You can buy these from most craft stores:


Or, there are a ton of tutorials online that you could do for cheaper.  I have really good intentions to make some of these, but it hasn't happened yet (that whole last minute Christmas crafting issue isn't helping), so I just use bags of pasta, chocolate chips, books, or whatever else I have on hand.  (Beware open bags though...the twisty came off my pasta in the middle of one my projects and I didn't realize it, so when I tossed it to the side I got a pasta shower.  Thor thought it was great).

I think that's it for now...but coming up: Last-Minute DIY Christmas Gifts--the irony is just too much.


Monday, December 12, 2011

Top ten crafting necessities....#7-#4

So I've been slacking...this weekend just wasn't conducive to blogging.  Which means today is like Christmas coming early with four things in one! Yay! I can feel your extreme excitement already.

But first...

A quick update on my Christmas crafting. I was all excited to post a tutorial on this fabulous fabric Christmas star decoration I was making. And then it turned into an epic crafting disaster.  I followed this fabulous tutorial to make a star from The Lovely Residence.  I had already made one out of paper, but thought it would be cute to do one out of two pieces of fabric sandwiched together with fusible web.  What I did NOT consider was that fabric lacks structure...the result? One super saggy star. I haven't totally given up yet...I may try some starch or fabric stiffener. Or not. I mean that was an hour of my life that I'll never get back.

On to the countdown!

#7: Good adhesive

Originally I planned on this just being a glue gun...because no crafter can survive without a good (or super cheap Wal-Mart model) glue gun.
And, before I proceed, a couple of glue gun tips...if you can buy a multi temp one, that is the way to go.  But if that is not in the budget (it wasn't in mine...I'm such a tightwad) buy low temp.  Why? Because when you have to glue something and then hold it in place, you won't burn your fingers. (Or when you inadvertently glue your fingers together--much less pain).

I may be about 5 years behind everyone, but I just discovered this magical adhesive that is taking the place of my glue gun in a lot of my crafting.  Fabri-tac!
Reasons Why I Prefer it to Hot Glue
1. No damn hot glue strings that leave you wound up like a mummy by the time you're done.
2. You don't have to wait for it to heat up (and no additional costs to your power bill!)
3. It is permanent, washable, and yet totally thin...you can't tell there's a wad of glue under there.
4. Excess glue doesn't show.
5. No finger burnage.

#6: Honest Friends

Having an arsenal of friends/family who will give you their unfiltered, honest opinions cannot be overlooked.  Just because you think the new dress you made looks great, doesn't mean it does.  Anytime I make something new, I picture mail it either to my sister or my best friend, Krystanne.  Because I know they will tell me if I look like a 2-cent whore.  It happens.

#5: Seam Ripper

Sometimes your greatest enemy can be a lifesaver.  My greatest enemy? A seam ripper.  It means that once again I was sewing without thinking, and now will spend the next hour undoing what took me 5 minutes to do.  My recommendation is that you have at least 2-3 of these damn little things laying around. Because you will lose them, or your cat will steal them and hide them...not that I'm speaking from experience or anything.
#4: Ability to Admit Defeat

This ties in well with the seam ripper.  When you get to that point where all you want to do is punch the next person who walk through the door, throw your sewing maching across the room, and/or curl up in the fetal position and cry...it's time to walk away (and yes, we've all been there).  Another hint: if something's not working and you quit, fold it up, and think 'I will rework that when I have more time,' be realistic with yourself...you won't.  So either save it and reuse the fabric, toss it, or pawn it off on someone else.

And with that happy thought, I'm off.

Thursday, December 8, 2011

Top ten crafting necessities...#8

Can you believe I have only done 2 of these and I already had to look back and see what number I was on?
My dad says I'm special.

Onward! My next crafting necessity is..........................................

A Dress Form


I wish I could say that I had been using one for years, patterning my own clothes with it, etc. but that would be a lie.  I just discovered the magic of this a few months ago, and now cannot imagine my life without it.

There are many options in the world of dress forms, from adjustable to dress sizes, and ranging just as much in cost.

I debated a lot in dress form shopping, and originally wanted an adjustable one, so that I could use it to make clothes for myself and others (if I happened to be in a generous mood).

The problem(s):
A) They're expensive, no matter where you look
B) I'm built just like my dad...which would be great. If I were a dude. So, I'm tall, slender-ish, and absolutely curve-less. (My sister took all of those...bitch).  After measuring myself and comparing it to the size charts for the adjustable dress forms, I realized that they didn't adjust to fit long-legged, short-waisted, curveless (and bustless) people. Super.

I thought about buying one and padding it, etc. but seriously? If I'm spending the money, it better be right as is.

I decided to do the next best thing...make one myself! I looked up tutorials on how to do it, and thought, hey! I could do that.

I just hadn't gotten around to it until one night when my sister and I had met up for one of our wine drinking/crafting nights (heavy on the wine, light on the crafting) and we thought it would be a grand idea.

So I went on a pie run, and picked up some duct tape and a clearance t-shirt (that is the only perk of having a super Wal-Mart).

We followed the tutorial here.  Well kind of.  If there had been less drinking and we had, I don't know, taken some time, the result might have been a little better.  But it worked!  My dress form is a little, uh, lumpier than I would have liked, and my shoulders are a little uneven, etc.  However, my final cost was like $8, so I can't complain.  (I do have plans to make a sober version soon).

I just made mine with a hanger at the top, but my next one I think I want with a stand (for ease of draping).

AND you can use it to make clothes for people of different sizes too...I made my sister a dress on it, and though it didn't fit right, it was nice to have the "person" to pin on.

I draped a cocktail dress on it that I was going to wear to the open house at my sister's salon, finished the dress, tried it on, and realized I looked like Jane. Of the Jungle. Not good.  This was, of course, the night before the event.  Fashion crisis.  BUT because I had my handy dandy dress form, I was able to whip another one out in about an hour (structurally/design-wise, not my best work, but this was a way time crunch):

It was a Tim Gunn "make it work" moment. (Sorry about the mirror/cell picture...I took this to send to my sister to get her opinion).

New kitchen decor!

(This is a quick interlude from my countdown, I'll continue with that in a few)

My mom laughs at me constantly because I am never happy with my decor. Ever. I redecorate/retheme like every 6 months.  Lately, my problem has been with my kitchen...so it was time for a redo!  I just ordered fabric to recover my chairs (pictures soon) and in addition to my mixer art I did a few more framed pieces.

I bought a set of 40+ vintage advertising cookbooks on eBay (yep, still an addict) awhile ago for $15 (including shipping!) and have been waiting to get inspired for the perfect project.

Here's what I ended up with:


My main colors are going to be green, yellow and teal (all vintage hues, of course) with other colors added in...because heaven forbid I have a room with matchy matchy decor. Which, when I have my own house with it's 1950's kitchen* will look fab.
*post-Mega Millions lottery win, of course.

You could do this with any sort of old media--advertisements, newspapers, magazine/book covers, etc.

My next project will be with this little wonderment (picked up at a yardsale for 50 cents...and yes it works, but I totally bought it for the box):


"Guaranteed to crack your nut."

Wednesday, December 7, 2011

Top 10 crafting necessities...#9

Number 9 on my countdown is a rotary cutter, mat and clear ruler.

Seriously, even if you don't sew, this will change your life.  I use mine for sewing, papercrafting, measuring walls, slicing my fingers open...you get the idea.  And it's not just for cutting straight lines either, they're great for cutting around patterns.  My biggest piece of advice: even though blades are expensive, change them frequently! If you are sawing through fabric or paper...probably time to switch that thing out.

Tuesday, December 6, 2011

My top 10 craft necessities countdown...#10

I thought that starting this blog in the winter would be perfect, because I tend to craft less in the summer.  What I didn't think about was that the majority of my crafting right now is Christmas presents...which I can't really post on here, as my family does read this (or they better be).

But post-Christmas, get ready!

To start off the countdown to the holidays, I thought I'd share my top 10 crafting necessity countdown (there'll be one a day so stay tuned.)  Without these, my life would be incomplete and gray.*
*slight dramatization

These are in no particular order (I just couldn't value one above the other):

A good sewing machine

Note that good does not necessarily mean new.  Deciding what your needs are will determine whic machine is best for you.  For instance, if all you need is a machine that goes forward and backward, I would recommend a vintage Singer (you can pick one up on eBay for less than $40).


My mom and I purchased a heavy duty vintage Singer that I still use to sew leather, because as much as I love my new machine..."they don't make 'em like they used to."

However, if you need something with a few more bells and whistles, consider a Brother machine (not a paid advertisement, I swear).  I did a lot of research before I bought mine--yes I'm one of those people--but I couldn't be happier with my Brother CS6000i.
Next on my wishlist? A serger...

Thursday, December 1, 2011

ten minute wall art

This title may be a little misleading for some, but to be clear: this would take 10 minutes for a person to do IF they're alone and without distractions.  I, however, had "help":


Don't let the face fool you.  He's a devil. His version of "help" was pouncing on my hands as I cut, racing through the middle of my projects and attacking the iron.  And of course now, NOW that I'm all done, he's curled up next to me taking a nap.  Punk.

Anyway, on to the project.

Preface: Tomorrow is going to be a great day. Why? Because after two years of agonizing over price, color and model, I finally bought a KitchenAid mixer.  Which means today was spent cleaning and decorating my kitchen for my mixer.

Totally pathetic, I know.

I needed something big and simple for one of my walls, so I thought what better way than to make mixer art?!
(Of course, if you are not obsessing about a new appliance, you could pick anything)

Supplies
Poster frame (I bought a black frame at Wal-Mart and spray painted it the color I wanted)
Graphic that measures about 20"x20", or whatever is appropriate for the size of your frame
Muslin, or other solid fabric
Cotton fabric
Fusible web (I actually didn't have any of this on hand (crafting sin, I know!) but I had some double sided heavy duty stuff that I used, and I kind of liked it...it gave the mixer some dimension)


1) Wrap the muslin around the cardboard backing of the frame, and tape in place.

2) Fuse a square of webbing onto the backside of your cotton print and trace your graphic (reverse side up).

3) Cut out and figure out placement on your muslin.


4) Iron.

5) Place in frame, pull muslin taut.

All done!
You may now hit your easy button.


It's fun, simple, and goes with my vintage-themed kitchen.